Module Google
Informations
| Module name | |
| Editor / Editeur | DoliCloud - www.dolicloud.com |
| Download or buy page / Page achat ou téléchargement | External module - www.dolistore.com |
| Status / Statut / Estado | Stable |
| Prerequisites / Prérequis |
Dolibarr min version: See on Dolistore Dolibarr max version: See on Dolistore |
| Last update date / Date mise à jour fiche / Fecha última actualización | 2025-10-16 |
| Note / Nota |
Features
This module provides some Google integration into Dolibarr:
- Synchronize your third parties/contacts or members into Google Contacts (Dolibarr to Google direction, no Google to Dolibarr direction). Warning Google has a limit of 25 000 contacts.
- Synchronize any event created or modified into Dolibarr agenda to Google Agenda (Dolibarr to Google direction is automtic, Direction Google to Dolibarr need to click on a link).
- Add a pictogram near all addresses. A click on it show address inside a Google Maps.
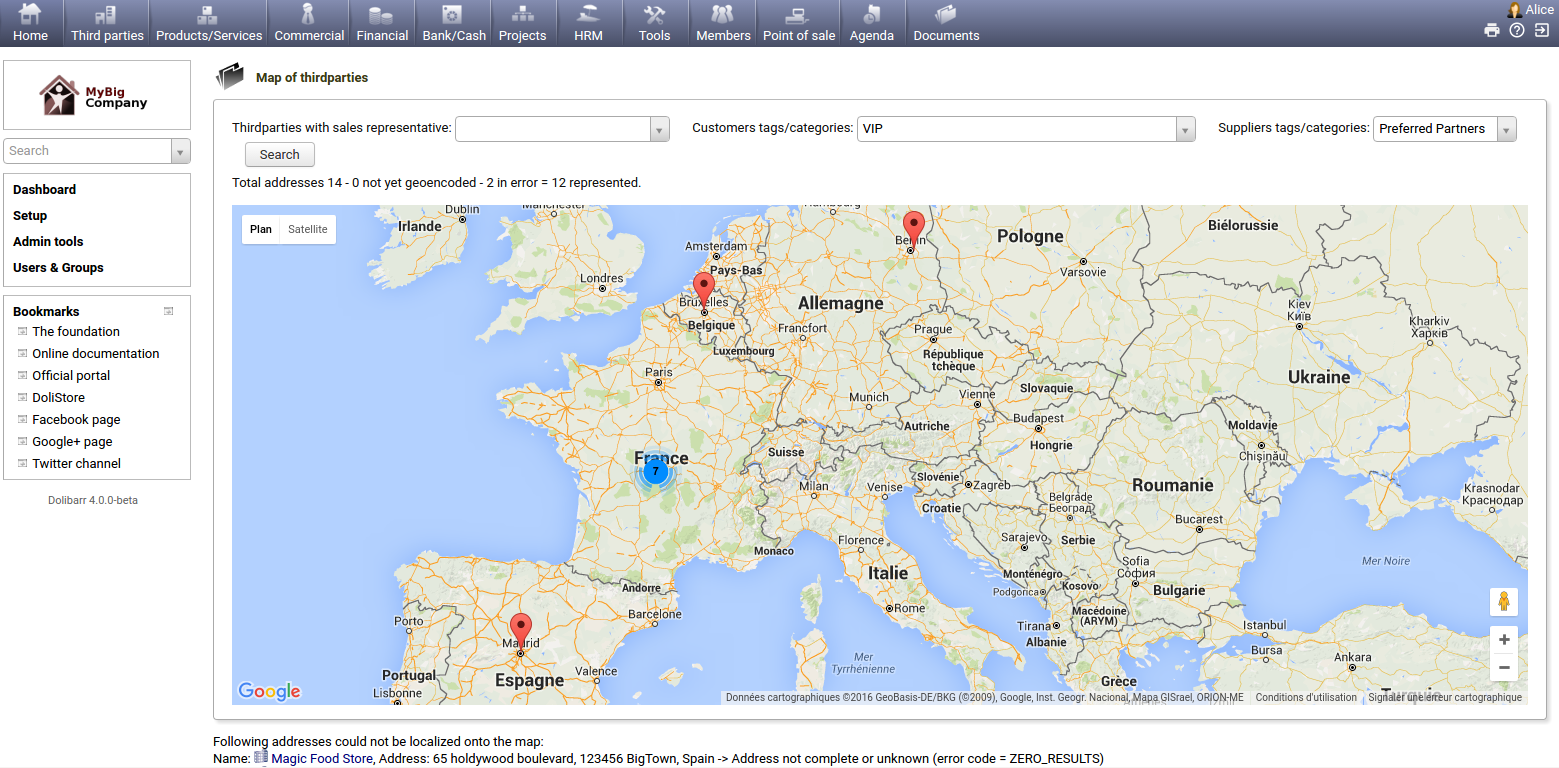
- Add a view of location of all your customers/members into Google Maps.
- Can add a Google Adsense tag into logon page.
- Can add a Google Analytics tag into any software pages.
- Compatible with all standard Google Gmail account and with Google Apps Gmail account (from version 3.4.5 of module)
Install
From the application
- Download the archive file of module (.zip file)
- Go on menu Home -> Setup -> Modules -> Deploy external module and submit the file.
- Module is then visible into list of available modules (Home -> Setup -> Modules) and can be activated.
Manually
- Download the archive file of module (.zip file)
- Put the file into the root directory of Dolibarr.
- Uncompress the archive file, for example with command
unzip modulefile.zip
- Module is then visible into list of available modules (Home -> Setup -> Modules) and can be activated.
Setup
To use this module, you must first enable it using an administrator account, via the menu option "Home - Setup - Modules".
Choose the tab where the module is listed. Then click on "Activate".
The module is now activated.
If a cog icon appears ![]() on module thumb or at end of the line of the module, click on it to access the setup page specific to the module.
on module thumb or at end of the line of the module, click on it to access the setup page specific to the module.
Setup of Google Contact
This module allows you to synchronize your Dolibarr contact toward your Google contact annuary (only in this direction). The object you can synchronize are:
- Third parties
- Contact addresses of thirdparties
- Members of the membership management module.
Synchronisation of contacts can be done toward only 1 Google account. However, using the Google sharing features (delegate contacts), everybody could see them.
1) You must first enable the API for your Google account. For this go on page https://console.developers.google.com/apis/credentials, menu "API & Authentication" -> "Enable API". Click to enable API for "Contact API".
2) Then go on the setup page of Google module in Dolibarr, choose all Dolibarr elements you want to synchronize among (You can choose several choices):
- Thirdparties (if module Thirdparty is enabled)
- Contacts/addresses of thirdparties (if module Thirdparty is enabed)
- Members (if module foundation members is enabled)
For each type of synchronization activated, enter a label of the Google Group of your choice. This is the group visible into Google to group all records together. Group will be created into Google Contact if not exists. You can also use a label of one of any predefined Google system group like: "System Group: My Contacts", "System Group: Friend", "System Group: CoWorker", "System Group: Family"
Note also that only the predefined system group "System Group: My Contacts" is shared by the "Delegate contacts" Google feature of Google contact (Google Apps for Work). So if you want to share your Google contact annuary, that contains Dolibarr records, to have other users seeing it, you must put your Dolibarr records into this group. They can't be put into another group if you plan such a share (only one account can be used).
Then enter the following information:
3) The Google login account (example myaccount@gmail.com or myname@mycompany.com)
4) The Google Client ID and the Google Client Secret. You can create your Google Client ID and Secret from page https://console.developers.google.com/apis/credentials, menu "API & Authentication" -> "Credentials". Click on "Create a client ID" and choose "Web Application", set "Allowed Javascript origin" to empty and set "Redirect URI" to the value provided into the "Note" on the setup page. It should be something like http://mycompanydomain/.../google/oauth2callback.php
5) Then click on button "Create". You will get a new Client ID and a Secret code. Save the Google setup page after filling Client ID and Secret Code.
6) A warning on Dolibarr screen should say you don't have yet any Google token saved into your Dolibarr database. Click on the link to authenticate, enter your Google credential if requested (same account than the account entered at step 2 and accept any confirmation. You should go back on the Dolibarr setup page, but a value for the token, saved into your Dolibarr database should appears.
7) Buttons to make synchronization tests should be available. Click on them to make tests.
8) You can now export your third parties/contacts/members to Google Contacts. In addition, when you create, modify or delete a third party/contact/member directly from the Dolibarr pages provided for this purpose, the modifications will be carried over to Google Contacts without you having to worry about it. Finally, the labels assigned to each of the Dolibarr elements will also be carried over to Google Contacts.
TroubleShooting
 Note: If you have the error 400: redirect_uri_mismatch, it is because step 4 of the configuration was not done or was done incorrectly (example: a typo was made when entering the URL in the Google configuration)
 Note: A possible error is that Google denies access, even if your setup is correct, just because the server that host Dolibarr is located into another country than the country you are using Google apps usually.
To check Google has locked your access for this reason, go onto page https://security.google.com/settings/security/activity after failure.
If it appears Google has blocked access attempts from an unusual location, accept this attempt. Then, you must wait 24 hours to try again.
 Note: Another possible error is that the domain your Dolibarr is running on is not a Google validated domain. See https://support.google.com/cloud/answer/6158849#authorized-domains&zippy= to have your domain name validated by Google.
 Note: Another possible error is that Google denies access even if your setup is correct, because the server Dolibarr runs on or your local computer is not on time. Check that date and hour of your computer and server are correct.
Setup of Google Calendar/agenda features
Synchronize events from Dolibarr to Google Agenda
The other feature is to write/update an event into Google Calendar, each time an event is added/updated into Dolibarr.
The event is pushed to a unique Agenda by default (1 Google account). If you choose to use one agenda per user, the event will be pushed to the agenda of the owner of the event (see later).
To setup this synchronization, go onto module setup page, tab "Sync to Google Agenda", and set "Create a Google event into Google Calendar when creating a Dolibarr event" to "Yes".
Then, you must setup and enter the API keys provided by Google. This is done in several step.
1) You must also enable the API for your Google account. For this go on page https://console.developers.google.com/apis/credentials, menu "API & Authentication" -> "Enable API". Click to enable API for "Calendar API".
2) Find the Google Agenda ID or your calendar.
For this,
- Log to http://calendar.google.com
- Click on the "Parameters" link in the wheels
- Click on the name of Agenda to show the Details of agenda.
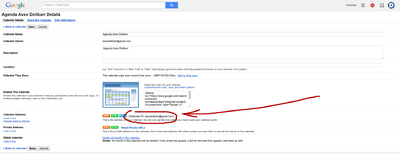
- Search line "URL Address", you will see a text "Calendar ID: theagendaid@gmail.com" like into the following screenshot
Fill this found ID into the Dolibarr setup field "ID Agenda". It means all events will be synchronized toward this agenda.
Note: you can keep this field empty and fill instead the "ID Agenda" at the user card level (into tab "Google" on each user card). Each user can have its own calendar. In such a case, it is the owner of the event (visible on Dolibarr event card) that will be used by Dolibarr to know which Agenda ID to target for synchronization. It means each event into Dolibarr can be pushed only toward one and only one agenda (if there is several users assigned to event, it is the owner of event that will be targeted). Note also that in such a case, step 5 must also be done for each Google account.
3) You must create a service account user/email from page https://console.developers.google.com/apis/credentials, menu "Credentials" . Click on "Create a client ID/Credential" and choose "Service Account". Choose a name for your service account and click "Done". Then on the tab "Keys" for this service account, create a key with "type of file JSON" then "Create" to get the JSON key file.
After this step, you will get:
- A new service account with a Service account EMail (for example myname-890@myprojectdomain.iam.gserviceaccount.com). We will use it at next step.
- A .json file. We will use it at next step.
If you choose to synchronize to only 1 unique Google agenda target or to one different agenda for each user, you have only to create 1 service account. However, you may need to give permissions to all google account if you set 1 different agenda for each user (see step 5).
You can also create a service account from page https://console.developers.google.com/iam-admin/serviceaccounts.
4) Submit the information received and the downloaded file on the Dolibarr setup page, tab "Sync to Google Agenda".
5) You must also share the agenda (all permissions) with the service account user/email (created at step 2): For this, go into Google calendar, choose "Settings and Sharing" from the combo list on the right of your Agenda on the area "My Calendars" (It must be same Agenda than the one chosen on parameter "ID Agenda" at step 1). Click on link "Share with Specific people". Then add the service account user into the email field, choose permission "Make changes to events" and validate.
With Google Apps for work (not required for standard gmail account), permissions may be forced to "Ready only" instead of "Edit". To solve this, go onto
https://admin.google.com/ac/appslist/core - Google Agenda - General parameters and check that sharing option of Agenda application allows sharing with external service account. ![]() A 24h delay may be required to be able to return and finish step 5.
A 24h delay may be required to be able to return and finish step 5.
Once all steps are done, you can use the button to make a synchronization test. Click on it to make a test.
TroubleShooting
- If you receive error "Client error: `POST https://oauth2.googleapis.com/token` resulted in a `401 Unauthorized` response: { 'error': 'unauthorized_client', 'error_description': 'Client is unauthorized to retrieve access tokens using this (truncated...)":
- If you have a free Gmail account, disable the option "Add also list of attendees into event." (not supported with such accounts).
- If you have the Google Suite, you can also disable the option "Add also list of attendees into event" (recent version of Google API does not support this very well), or, you can try to "Authorize the service account to access data on behalf of a user" as explained on Google doc: https://support.google.com/a/answer/162106?hl=en&fl=1&sjid=4000630194749189449-NA, chapter "Set up domain-wide delegation for a client". This is the summary here: Go to Menu Security > Access and data control > API controls > Manage Domain Wide Delegation. Click Add new. Enter the Client ID for either the service account or the OAuth2 client. In OAuth Scopes, add the scopes https://www.googleapis.com/auth/calendar and https://www.googleapis.com/auth/calendar.events. Click Authorize. If you get an error, the client ID might not be registered with Google or there might be duplicate or unsupported scopes. Wait 24h after modification is saved and try a synchronisation.
- If you receive error "ERROR { 'error': { 'code': 403, 'message': 'Google Calendar API has not been used in project ... before or it is disabled...": Check the step 1 was done.
- If you receive error "ERROR Error calling POST https://www.googleapis.com/calendar/v3/calendars/yourcalendarid/events: (404) Not Found": Check the step 5 was done.
- If you receive error "ERROR Error calling POST https://www.googleapis.com/calendar/v3/calendars/yourcalendarid/events: (403) Forbidden": Check the step 5 was done and that permission granted was read and write and not read only.
 Note: A possible error is that Google denies access, even if your setup is correct, just because the server that host Dolibarr is located into another country or region than the one using google apps usually.
To check Google has locked your access for this reason, go onto page https://security.google.com/settings/security/activity?hl=fr after failure.
If it appears Google has blocked access attempts from an unusual location, accept this attempt. Then, you must wait 24 hours to try again.
 Note: Another possible error is that Google denies access even if your setup is correct, because the server Dolibarr runs on or your local computer is not on time. Check that date and hour of your computer and server are correct.
Synchronize events from Google Agenda to Dolibarr
This feature requires a manual act each time synchronization is needed: Go to the "Agenda/Events" menu, to the "List" view. You must click on the link "Refresh events from Google"
Setup of GMaps features
1) You must first enable the API for your Google account. For this go on page https://console.developers.google.com/apis/credentials, menu "API & Authentication" -> "Enable API". Click to enable API for "Google Maps Geocoding API" and "Google Maps JavaScript API".
2) Create an API key of type "Server" and enter it on the setup page of module Google in Dolibarr, tab GMaps.
Link to localize a specific address
Choose elements on which you want to see a GMaps picto after addresses, among (you can choose several choices):
- Third parties (if module Third party is enabled)
- Contacts/addresses of third parties (if module Third party is enabled)
- Members (if module foundation members is enabled)
Then define the zoom level to define scale used by default when a map will be output (value from 1 to 10, 10 is the more accurate zoom level). 7 is a recommended value.
Links to global maps
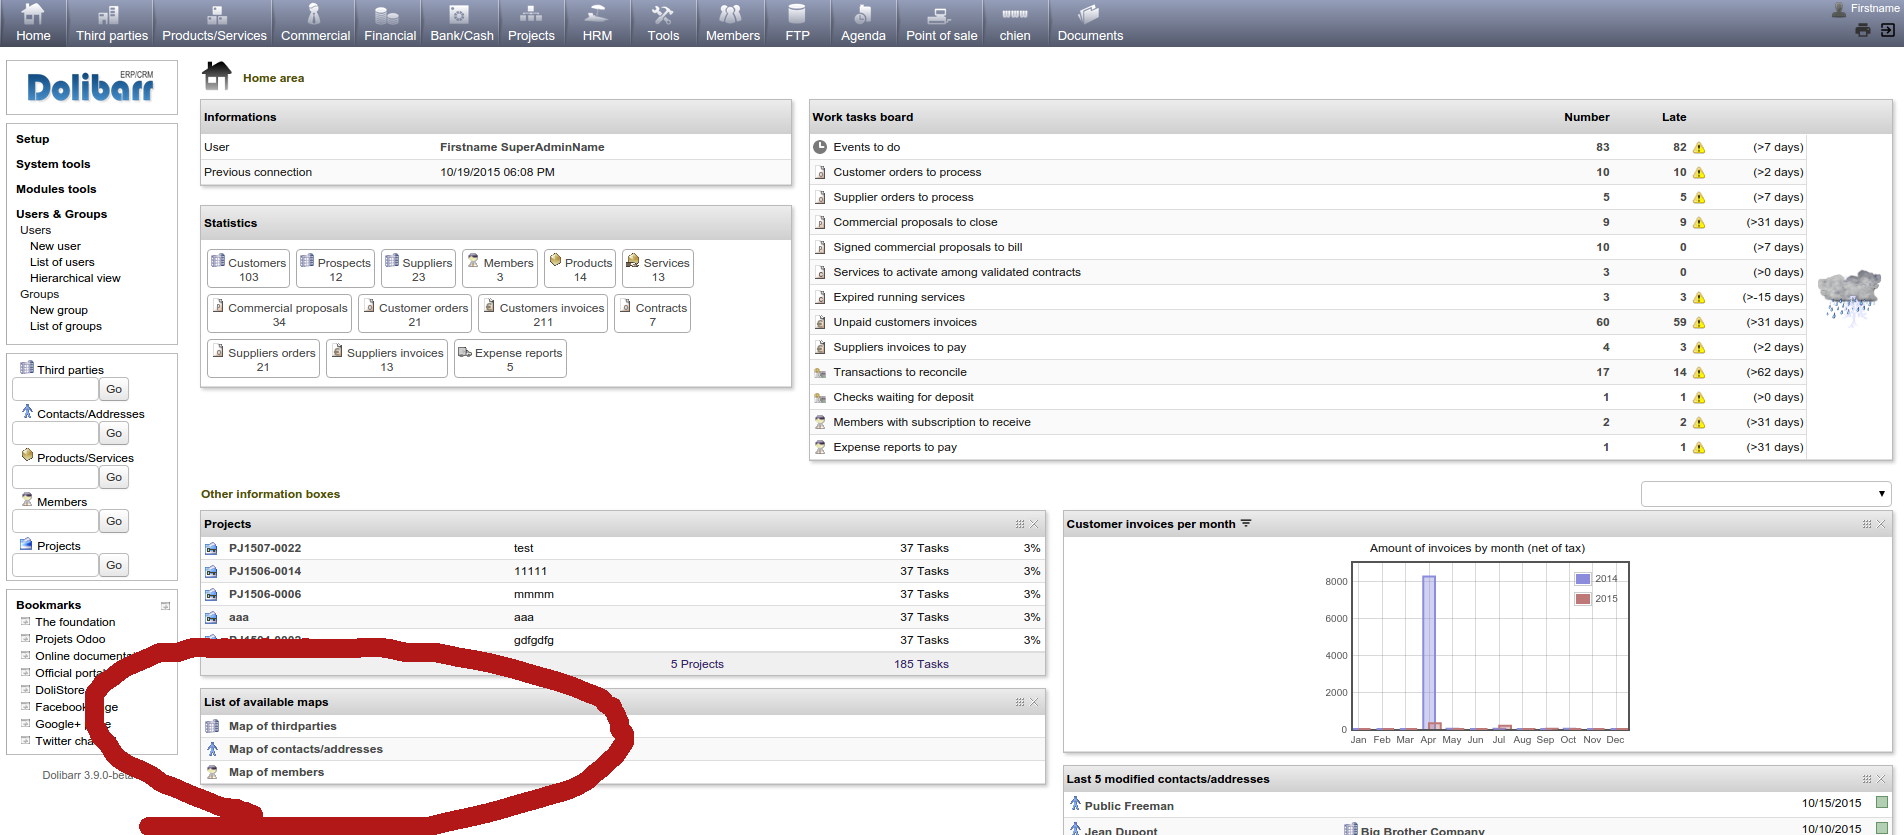
The other feature provided by module, is to show a global map with all your third parties, contact/addresses or members. To see link to those maps, go into menu Home -Setup - Boxes/Widgets. Check that the box "Links to Google Maps" is activated. Return to Dolibarr home page. If boxes does not appears, choose it into the combo list on the left, to add it definitely on you screen.
Setup of Adsense
If you want to enable adsense feature, on Adsense tab, enter:
- Your adsense customer id (ca-pub-xxxxxx)
Id specific to ad shown (you can find this id into Google adsenses dashboard adsense.google.com) An advert will be added onto demo and logon page.
Setup of Google analytics
If you want to enable analytics feature, on Analytics tab, enter:
- Your Google analytics id (something like UA-xxxxxxx-y). You can find this id on Google analytics dashboard.
The Google Analytics tag will be then output onto all Dolibarr pages.
Usage
Usage of Google Contact feature
- Dolibarr -> Google: Create or edit a thirdparty, contact or memeber (depending on which sync you enabled). Then go to Google contact. You should see the card created into Google.
- Google -> Dolibarr: Modification into this direction is not supported.
Usage of Google Agendas features
- Create or edit an event into Dolibarr. Then go onto Google Calendar, you should see it into Google calendar (for example on calendar of your Android smartphone).
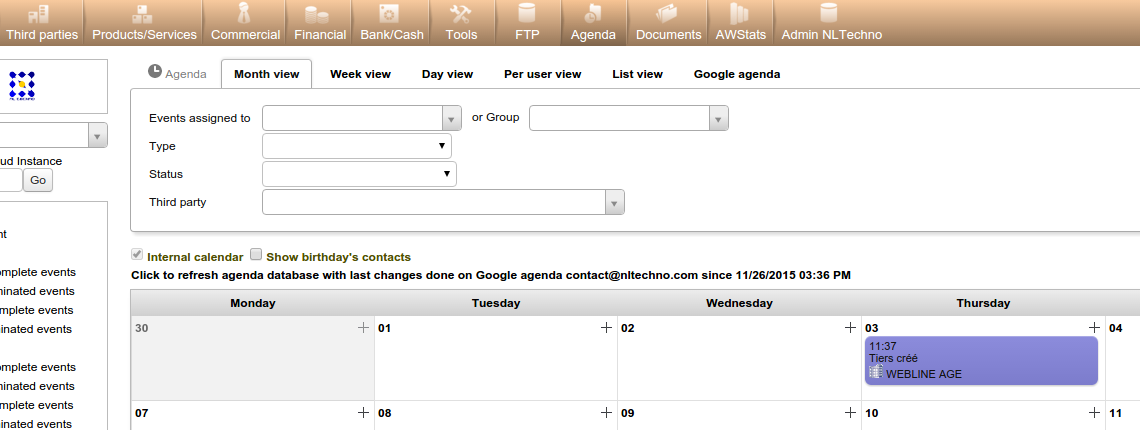
- If you need to synchronize changes done on Google side, go onto the agenda view. You should see a link to force synchronization from Google to Dolibarr. See example here. Link is sentence "Click to resfresh agenda database with ..."
Usage of GMaps feature
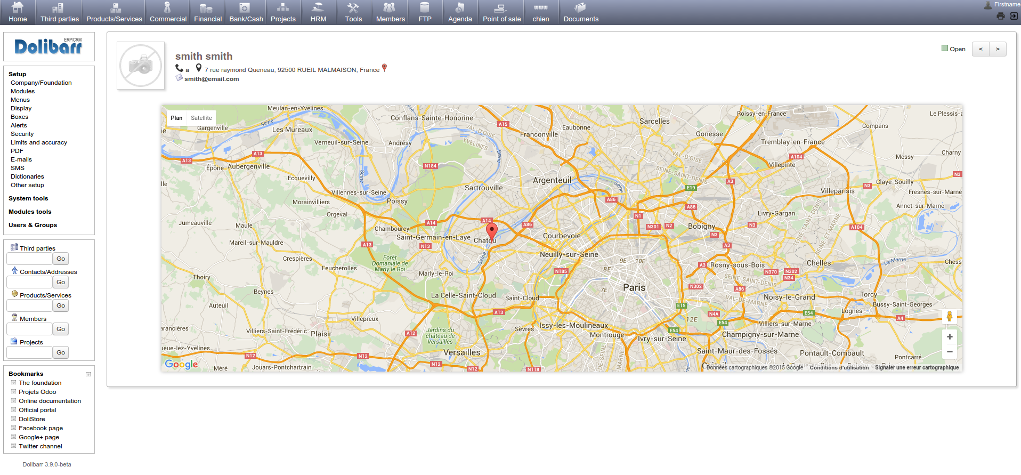
Depending on the choice made in configuration, a small pictogram appears on the third page, Contacts / Addresses or members after the address. By clicking above, you will see a map with the address positioned above. It is possible for you to navigate the map without leaving Dolibarr.
In addition, you also have access to a box on the home page with a link to see all of your third party or members on the same map.
This is an example when you click on link on home page to see "Map of customers".
Note that you can filter on sale representative, or any customer or supplier tag.
Usage of Adsense feature
There is no particular things to do. Once setup is done (see previous chapter), a Google Adsense advert will appear on login page.
Note: When Dolibarr is used with the Application Android - DoliDroid, advert will not be active.
Usage of Google Analytics
There is no particular things to do. Once setup is done (see previous chapter), a Google Analytics tag is added onto each Dolibarr page. By using the Google Analytic interface, you can have statistics on your Dolibarr usage, as if it was a public web site.
Note: When Dolibarr is used with the Application Android - DoliDroid, tag will not be active.
Development
The development of this module is not included inside the standard GIT repository of Dolibarr but inside a repository dedicated to modules not supported by the Dolibarr development team but supported by DoliCloud team:
- GIT Repository: git clone https://github.com/DoliCloud/DoliMods.git
Note that the code of all modules developed by DoliCloud team are presents in the same repository (1 sub-directory of htdocs = 1 module). They are all Open Source modules.
