Module Dolimport
Informations
| Module name | DOLIMPORT API |
| Editor / Editeur | Florian DUFOURG - demo |
| Download or buy page / Page achat ou téléchargement | External module - www.dolistore.com |
| Status / Statut / Estado | Stable |
| Prerequisites / Prérequis |
Dolibarr min version: See on Dolistore Dolibarr max version: See on Dolistore |
| Last update date / Date mise à jour fiche / Fecha última actualización | 2020-05-8 |
| Note / Nota |
Features
Import your bank statements from a csv file or connect directly the information from your QONTO bank account. Then many options are available :
- Create and paye a customer invoice
- Create and paye a vendor invoice
- Create and pay a VAT
- Create and pay a salary
- Create and pay a social and fiscal taxes
- Pay an existing customer invoice
- Pay an existing vendor invoice
- Pay a loan
- Pay an expense report
- Link a payment to a transaction
If you use QONTO API, you can download the attached files of QONTO directly from Dolibarr. Also the VAT and all other usefull information will be used to generate the Dolibarr elements.
If the reconciliation option of the bank account is activated in Dolibarr, Dolimport API will also automaticaly reconciliate the statement.
Install
- Download archive file of module (.zip file) from web site www.dolistore.com or from any other source.
- Install module into the /custom folder of Dolibarr:
- Go to Home - Setup - Modules - Deploy/install external app/module
- Upload the file. Note: If it fails because upload from this page has been locked by your web hosting provider, you can manually unzip the file into the /custom directory from command line: Go into the /custom directory and uncompress file with command unzip modulefile.zip then check that the directory with the nameof the module is inside the /custom directory. If into a subdirectory, just move it into /custom.
- Module should be ready to be activated and used.
Setup
To use this module, you must first enable it using an administrator account, via the menu option "Home - Setup - Modules".
Choose the tab where the module is listed. Then click on "Activate".
The module is now activated.
If a cog icon appears ![]() on module thumb or at end of the line of the module, click on it to access the setup page specific to the module.
on module thumb or at end of the line of the module, click on it to access the setup page specific to the module.
Module Configuration
Module setup page
Configure the module from the module setup page, you can define :
- The default project you want to link the element (this value can be change later in the form)
- The default VAT value (this value can be change later in the form or directly define in the CSV file or in QONTO)
- An option to show only open project in dolimport API form or all projects
- An option to add a unique number for vendor reference (avoid double reference)
- The period of time you want to show in the list of transaction
Bank card
If you want to use the module with a csv file, you have nothing more to do.
To connect Qonto to Dolibarr, go to the bank account card in Dolibarr.
Dolimport API automatically add 3 fields : ID API, KEY API and BANK API.
Extrafield BANK API setup
Select QONTO as BANK API value (for now it is the only option).
Extrafield ID API & KEY API setup
Go to your QONTO account : | QONTO
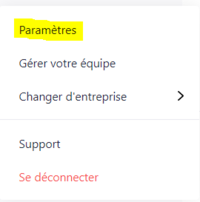
On the left menu of the QONTO web page, select "paramètres."

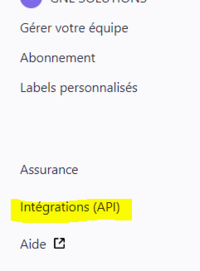
On the left menu select "intégration API".

Now you can go back to Dolibarr and fill the ID and KEY API with the info found on the QONTO website.
Menu
You can see this module in the left menu of the "bank" top menu.
If you choose the QONTO API option, only one link will appear in the menu, this is the list of transactions.
If you are not using QONTO API (so you are using CSV import), 2 links will appears in the menu, one to import transaction from a csv file and an other to see and process the transactions.
Import a file
Select a csv file from your bank account and click upload button.
Setting of the lines
Once your csv file is uploaded, select the category of each column (date of operation, date of value, amount, label, secondary label). You can choose a category only once (except for amount categorie that can be credit and debit). Press the hide column button to make the view easier to read.
Choose for each line the categorie of the line (provider invoice, charge, VAT, salary, loan, customer invoice). Let the categorie blank for the line you don't want to import.
Before to import give a name to the bank statement, it will help to reconcile.
Select the statement
In the billing | payment menu choose 'List of imported statements' and select the bank statement you want to transform as Dolibarr elements.
Generate the elements (invoices, taxes, salaries,loan...)
In the process page you can now check the information and click import to generate the new element (invoice, VAT, salary...).
If you prefer to generate a new file manually (without the help of the module), click the delete button.
The customer invoices are not generate by this module, we considere the customer invoices are already made by the user and the user will help to link the invoice to the payment from the bank account.


