Difference between revisions of "Module ModuleBuilder"
(→Usage) |
|||
| Line 28: | Line 28: | ||
The ModuleBuilder within Dolibarr presents a lot of features designed for the comprehensive management and development of module. | The ModuleBuilder within Dolibarr presents a lot of features designed for the comprehensive management and development of module. | ||
| − | === '''Language Support''': === | + | ==='''Language Support''':=== |
*This function allows developers to introduce additional languages into a module, enhancing its accessibility and usability across different linguistic demographics. | *This function allows developers to introduce additional languages into a module, enhancing its accessibility and usability across different linguistic demographics. | ||
| Line 37: | Line 37: | ||
<br /> | <br /> | ||
| − | === '''Menus''': === | + | ==='''Menus''':=== |
Enables the crafting of custom menus within the module's UI, allowing users to navigate through the module's features more efficiently. This might include adding new menu items linked to specific functionalities or adjusting the module's navigation structure. | Enables the crafting of custom menus within the module's UI, allowing users to navigate through the module's features more efficiently. This might include adding new menu items linked to specific functionalities or adjusting the module's navigation structure. | ||
| − | * Creating menus in the system is achieved through two distinct methods: Initially, when an object is created, three menus are automatically generated and displayed on the left sidebar. Alternatively, menus and sub-menus can be manually added by utilizing the form at the top of the table, which requires filling in specific fields such as title, URL, and position. Furthermore, permissions can be assigned to each menu to ensure they are only visible to users with the appropriate rights. | + | *Creating menus in the system is achieved through two distinct methods: Initially, when an object is created, three menus are automatically generated and displayed on the left sidebar. Alternatively, menus and sub-menus can be manually added by utilizing the form at the top of the table, which requires filling in specific fields such as title, URL, and position. Furthermore, permissions can be assigned to each menu to ensure they are only visible to users with the appropriate rights. |
| − | * The editing process mirrors this approach closely. | + | *The editing process mirrors this approach closely. |
| − | * For deletion, one needs to click on the trash can icon and confirm to proceed with the removal. | + | *For deletion, one needs to click on the trash can icon and confirm to proceed with the removal. |
<br /> | <br /> | ||
[[File:Menus.png|center|frameless|1482x1482px]] | [[File:Menus.png|center|frameless|1482x1482px]] | ||
| + | |||
| + | === Object: === | ||
| + | |||
| + | * To add an object, simply enter the name, choose an icon, and specify the name of an existing table, if nothing is specified, it creates a new table | ||
| + | * . The three check-boxes depend on your preference: one for enabling automatic numbering generation, the second for enabling PDF document creation, and the third to generate permissions for this object. | ||
| + | |||
| + | |||
| + | |||
| + | |||
| + | |||
| + | |||
| + | |||
<br /> | <br /> | ||
| − | + | ==='''Property Addition''':=== | |
| − | === '''Property Addition''': === | ||
This feature permits the extension of entities or modules by adding new properties. These properties can be utilized to store additional information, customize behavior, or integrate with other modules, enhancing the module's flexibility and capability. | This feature permits the extension of entities or modules by adding new properties. These properties can be utilized to store additional information, customize behavior, or integrate with other modules, enhancing the module's flexibility and capability. | ||
| − | * To add an additional attribute to a specific object, simply click on the "+" button to the right of the properties list, which will display a form allowing you to fill in fields such as label, type, code, etc. | + | *To add an additional attribute to a specific object, simply click on the "+" button to the right of the properties list, which will display a form allowing you to fill in fields such as label, type, code, etc. |
| − | * To modify, simply click on the pencil icon that appears in the same row of the list, which brings up a form for editing. | + | *To modify, simply click on the pencil icon that appears in the same row of the list, which brings up a form for editing. |
| − | * For deletion, the trash can icon allows for the removal of a property after confirmation. | + | *For deletion, the trash can icon allows for the removal of a property after confirmation. |
<br /> | <br /> | ||
| Line 61: | Line 72: | ||
<br /> | <br /> | ||
| − | === Permissions: === | + | ===Permissions:=== |
For permissions, there are two ways to create them: | For permissions, there are two ways to create them: | ||
| − | * By ticking the box at the bottom of the form during the creation of the object and it creating the 3 default permissions (create, write, delete). | + | *By ticking the box at the bottom of the form during the creation of the object and it creating the 3 default permissions (create, write, delete). |
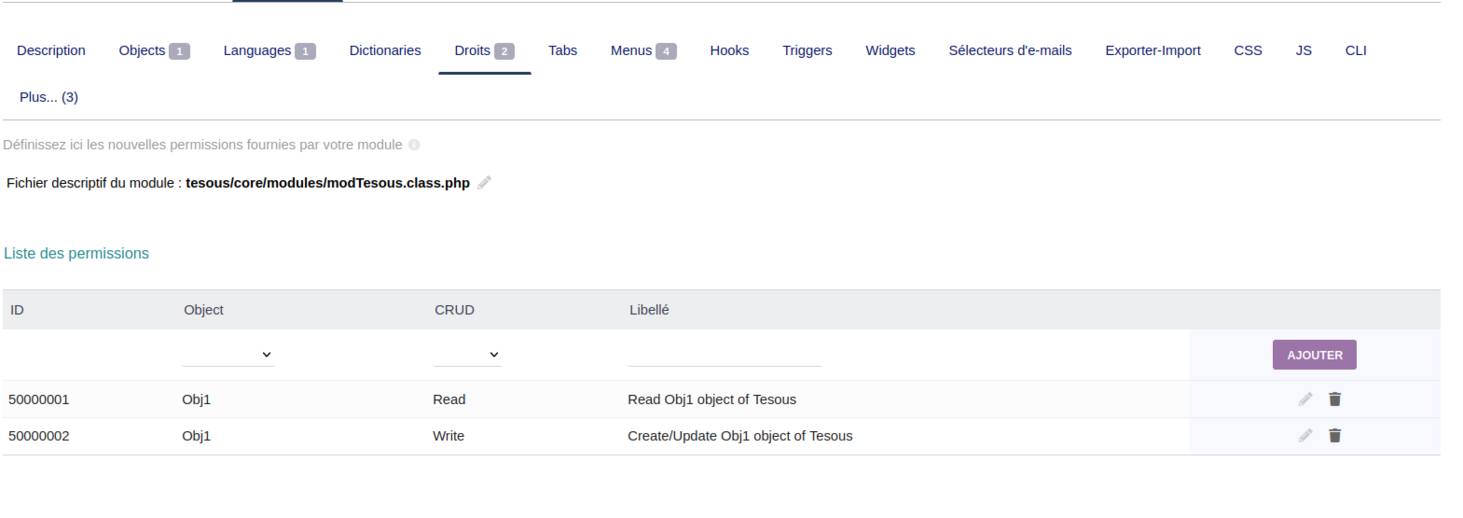
| − | * By manually creating them in the rights section, which provides a list of permissions for each object. The form at the top of the table allows you to select the object and choose a permission; the ID is automatically assigned, as well as the label, although you have the option to change it if desired. | + | *By manually creating them in the rights section, which provides a list of permissions for each object. The form at the top of the table allows you to select the object and choose a permission; the ID is automatically assigned, as well as the label, although you have the option to change it if desired. |
| − | [[File:PermissionsList.png|center|thumb| | + | <br />[[File:PermissionsList.png|center|thumb|1463x1463px]] |
<br /> | <br /> | ||
| − | === Dictionaries : === | + | ===Dictionaries :=== |
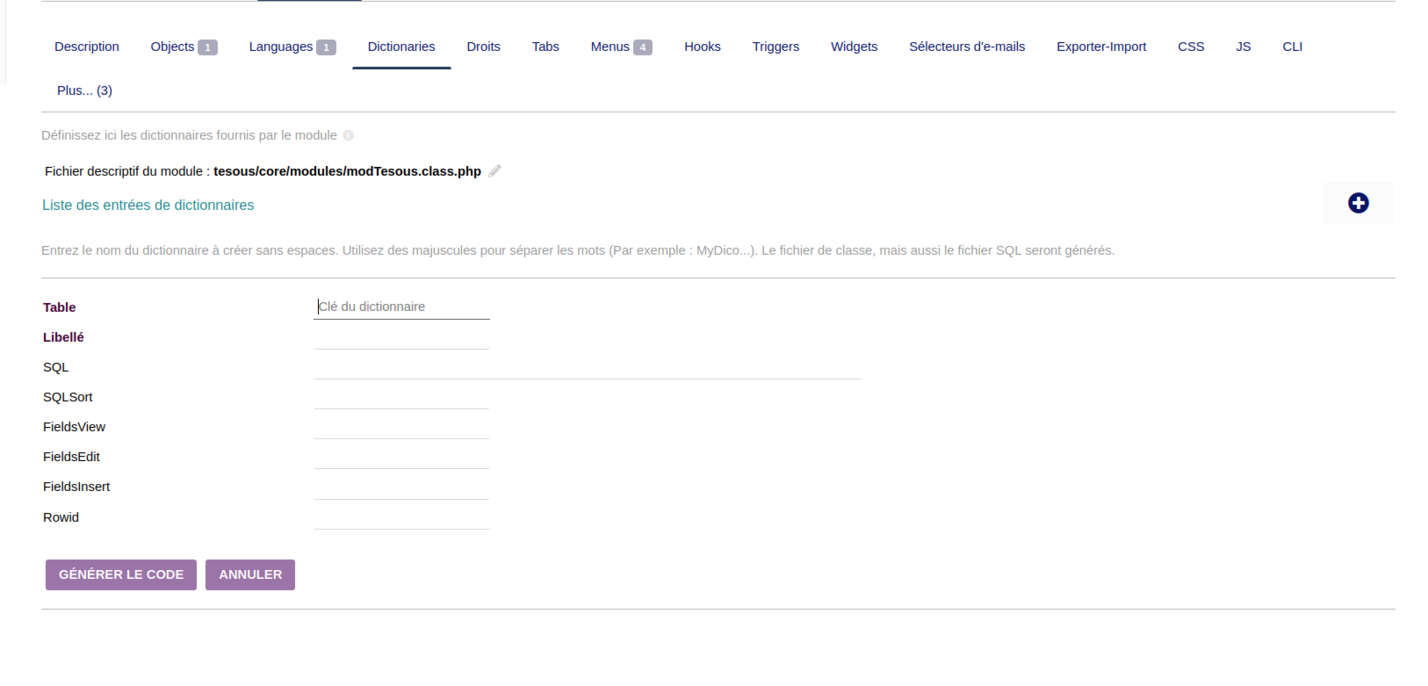
| − | * To create a dictionary, there is a dedicated section for this purpose. A create button (+) on the right displays a form to enter the name of the dictionary, which will become the name of the table in the database, preceded by "c_". | + | *To create a dictionary, there is a dedicated section for this purpose. A create button (+) on the right displays a form to enter the name of the dictionary, which will become the name of the table in the database, preceded by "c_". |
| − | * The other fields are automatically filled in, and it is recommended to leave them as they are. For editing, you have the option to change the label, the fields for sorting, and for inserting or editing. | + | *The other fields are automatically filled in, and it is recommended to leave them as they are. For editing, you have the option to change the label, the fields for sorting, and for inserting or editing. |
<br /> | <br /> | ||
Revision as of 16:41, 22 March 2024
| Foundations | |
|---|---|
| Numero/ID of module | 3300 |
| User doc. of module | This page |
| Developer doc. of module | |
Introduction
The ModuleBuilder is a module for developpers only, to help you to develop a module. It is RAD, No Code or Low Code tool.
Installation
This module is included with the Dolibarr distribution, so there is no need to install it.
Configuration
To use this module, you must first enable it using an administrator account, via the menu option "Home - Setup - Modules".
Choose the tab where the module is listed. Then click on "Activate".
The module is now activated.
If a cog icon appears ![]() on module thumb or at end of the line of the module, click on it to access the setup page specific to the module.
on module thumb or at end of the line of the module, click on it to access the setup page specific to the module.
Usage
The ModuleBuilder within Dolibarr presents a lot of features designed for the comprehensive management and development of module.
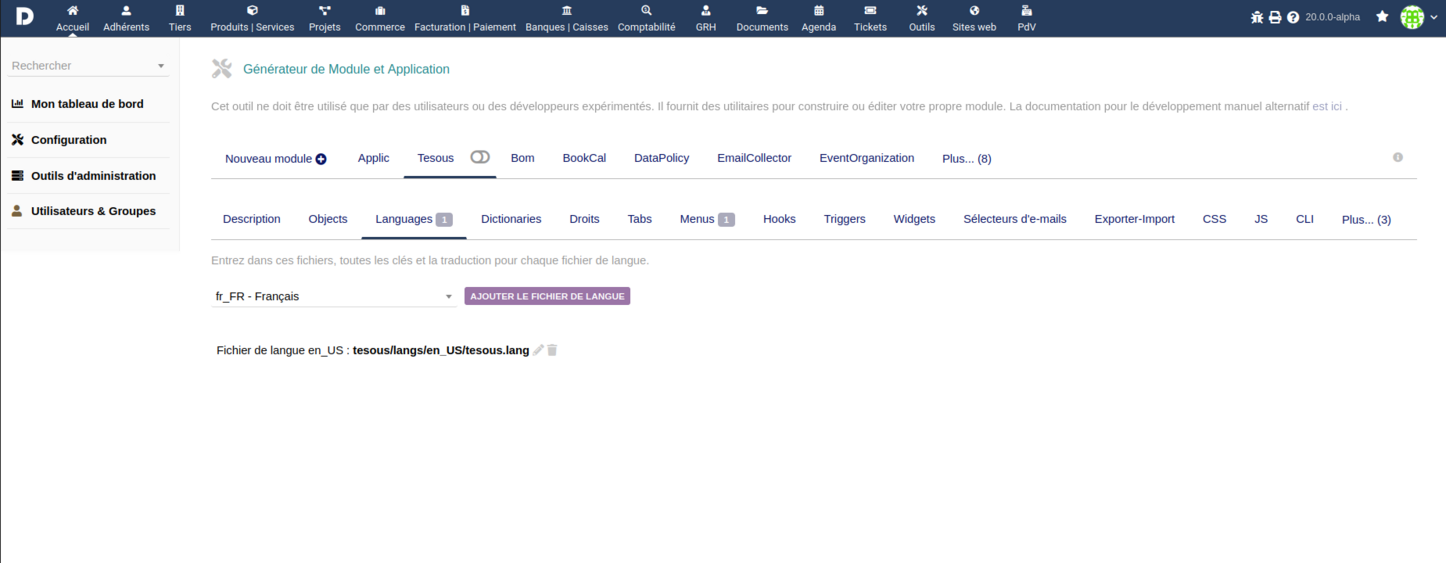
Language Support:
- This function allows developers to introduce additional languages into a module, enhancing its accessibility and usability across different linguistic demographics.
- It involves integrating new language files or entries that translate the module's interface and messages.
Menus:
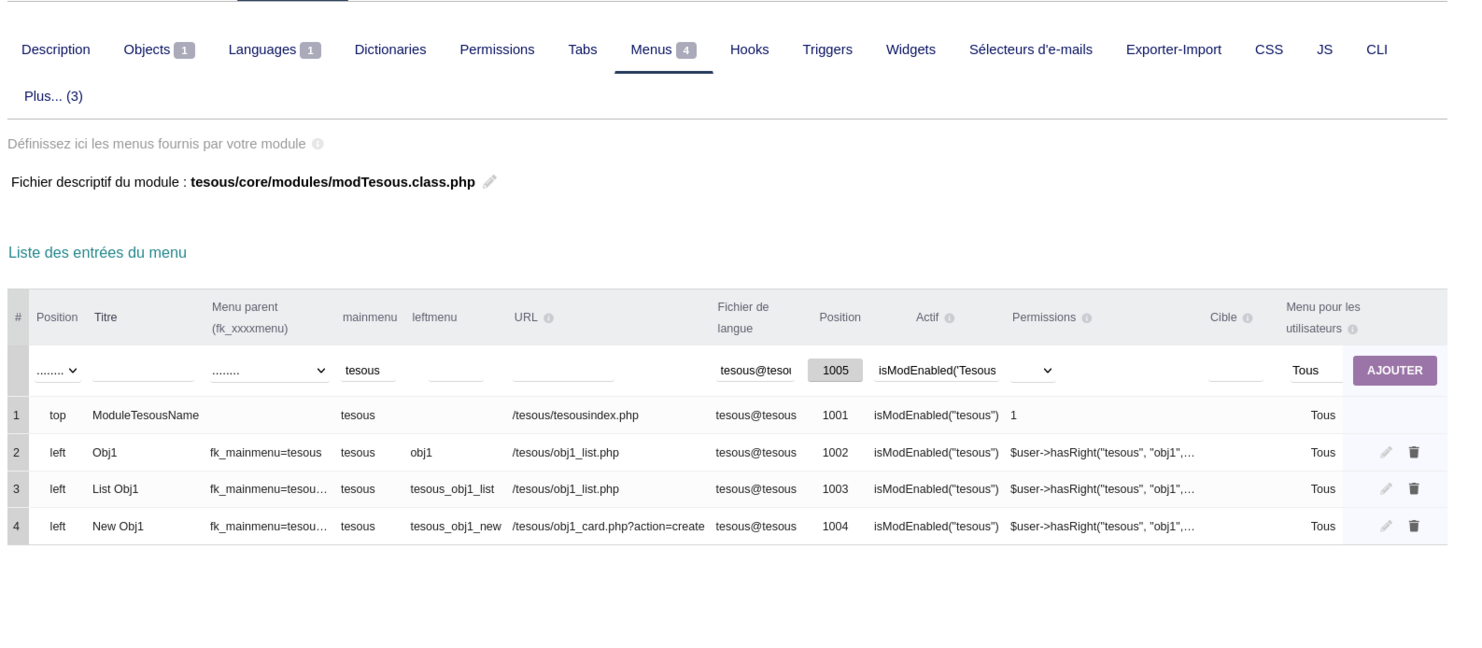
Enables the crafting of custom menus within the module's UI, allowing users to navigate through the module's features more efficiently. This might include adding new menu items linked to specific functionalities or adjusting the module's navigation structure.
- Creating menus in the system is achieved through two distinct methods: Initially, when an object is created, three menus are automatically generated and displayed on the left sidebar. Alternatively, menus and sub-menus can be manually added by utilizing the form at the top of the table, which requires filling in specific fields such as title, URL, and position. Furthermore, permissions can be assigned to each menu to ensure they are only visible to users with the appropriate rights.
- The editing process mirrors this approach closely.
- For deletion, one needs to click on the trash can icon and confirm to proceed with the removal.
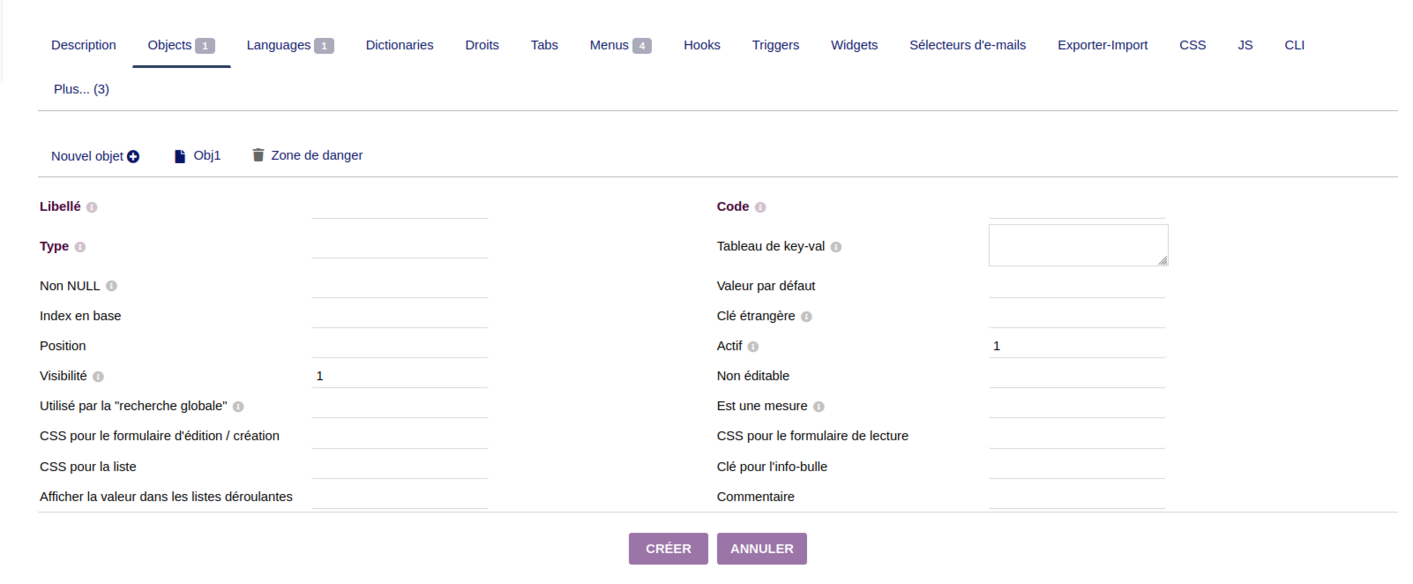
Object:
- To add an object, simply enter the name, choose an icon, and specify the name of an existing table, if nothing is specified, it creates a new table
- . The three check-boxes depend on your preference: one for enabling automatic numbering generation, the second for enabling PDF document creation, and the third to generate permissions for this object.
Property Addition:
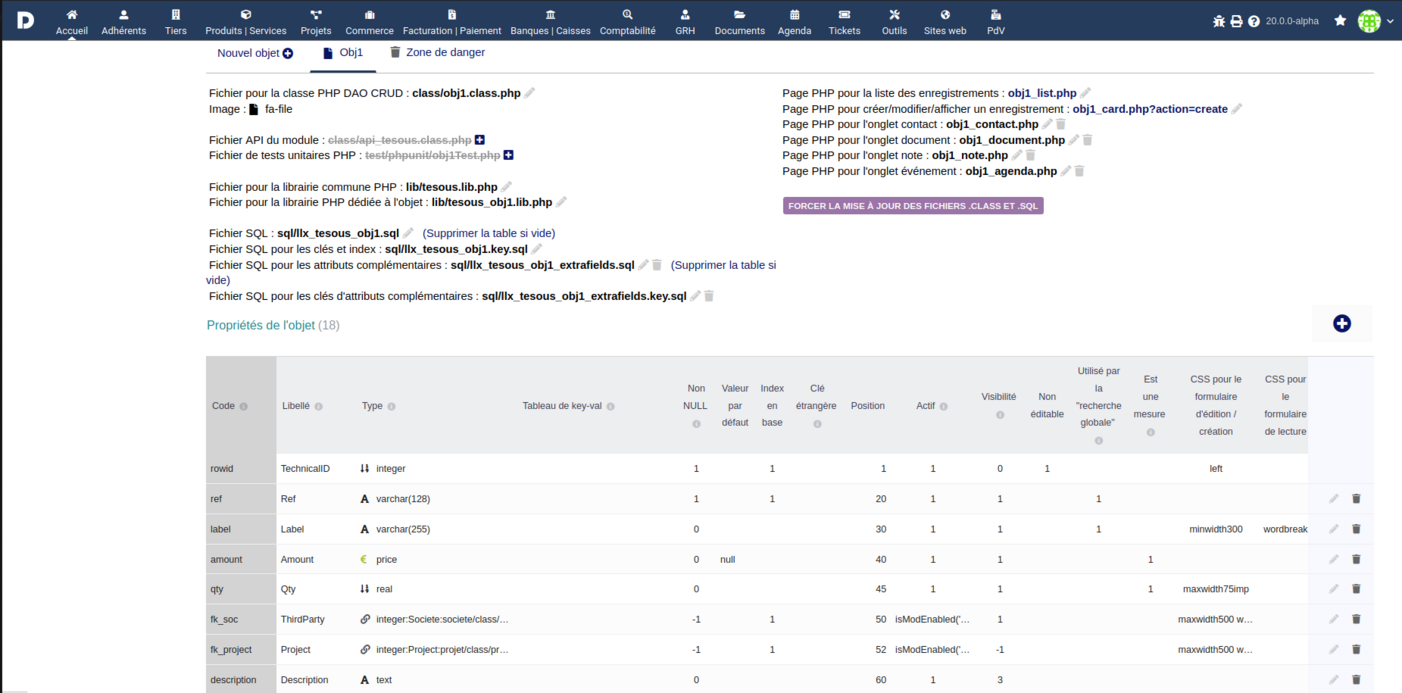
This feature permits the extension of entities or modules by adding new properties. These properties can be utilized to store additional information, customize behavior, or integrate with other modules, enhancing the module's flexibility and capability.
- To add an additional attribute to a specific object, simply click on the "+" button to the right of the properties list, which will display a form allowing you to fill in fields such as label, type, code, etc.
- To modify, simply click on the pencil icon that appears in the same row of the list, which brings up a form for editing.
- For deletion, the trash can icon allows for the removal of a property after confirmation.
Permissions:
For permissions, there are two ways to create them:
- By ticking the box at the bottom of the form during the creation of the object and it creating the 3 default permissions (create, write, delete).
- By manually creating them in the rights section, which provides a list of permissions for each object. The form at the top of the table allows you to select the object and choose a permission; the ID is automatically assigned, as well as the label, although you have the option to change it if desired.
Dictionaries :
- To create a dictionary, there is a dedicated section for this purpose. A create button (+) on the right displays a form to enter the name of the dictionary, which will become the name of the table in the database, preceded by "c_".
- The other fields are automatically filled in, and it is recommended to leave them as they are. For editing, you have the option to change the label, the fields for sorting, and for inserting or editing.

