Difference between revisions of "Using Dolibarr node in the n8n automation platform"
Lpierson002 (talk | contribs) (Layout modification) |
m Tag: 2017 source edit |
||
| (14 intermediate revisions by 2 users not shown) | |||
| Line 1: | Line 1: | ||
| + | {{TemplateDocUser}} | ||
| + | [[Category:No Code Automation]] | ||
| + | |||
| + | If you want a developer tutorial to the integration of Dolibarr to the n8n automation platform you can find it [[Integration of Dolibarr to the n8n automation platform|here.]] | ||
| + | |||
| + | ==Prerequisites== | ||
| + | The following tutorial assumes that you have completed the following prerequisites: | ||
| + | |||
| + | *You have access to an instance of Dolibarr configured to use SSL encryption (with the HTTPS protocol), | ||
| + | *You have access to a user account with rights to use some specific modules such as Calendar, Project or Documents, | ||
| + | *You have obtained an API key for this user account that you will be used to test your integration (generated by an administrator, or by the user himself if he has permission to modify his user account information). | ||
| + | |||
| + | When necessary, in this documentation, we will use the following URL to refer to your Dolibarr instance: `https://yourdolibarrurl`. You will have to replace it with the URL of your own Dolibarr instance, without trailing slash. | ||
| + | <br /> | ||
| + | |||
==Connecting to n8n== | ==Connecting to n8n== | ||
| − | + | As explained in previous parts, once you have created your n8n self-hosted instance on your computer and started it with the command : <code>n8n start</code> or <code>n8n</code>. | |
| + | |||
| + | Then you just have to press '''o''' on your terminal to open n8n in your browser. | ||
You should arrive to the following connexion screen where you can enter your connexion informations. | You should arrive to the following connexion screen where you can enter your connexion informations. | ||
| + | <br /> | ||
| + | [[File:Connecting to n8n.png|center|thumb|Connecting to n8n]] | ||
| + | |||
| − | |||
==Creating a Workflow using Dolibarr Node== | ==Creating a Workflow using Dolibarr Node== | ||
| − | |||
When you have signed in, you can create you first Workflow and selected the Dolibarr node. | When you have signed in, you can create you first Workflow and selected the Dolibarr node. | ||
| − | To do that you just have to click on '''Add Workflow''' to create one and click on the '''+''' to add a node to your Workflow. It will open a search bar in which you can search '''dolibarr''' to find it. | + | To do that, you just have to click on '''Add Workflow''' to create one and click on the '''+''' to add a node to your Workflow. It will open a search bar in which you can search '''dolibarr''' to find it. |
| + | [[File:Dolibarr node.png|center|thumb|Dolibarr node]] | ||
| − | |||
| + | ==Explanation of the different functionalities== | ||
| + | [[File:Different scenarios.png|center|thumb|Different scenarios]] | ||
| − | |||
| − | |||
| − | Here are the different Dolibarr | + | Here are the different Dolibarr functionalities we have implemented in n8n. |
| + | <br /> | ||
| − | |||
===General informations=== | ===General informations=== | ||
====Credentials==== | ====Credentials==== | ||
| − | + | A Dolibarr node needs to have set up credentials in order to connect your Dolibarr instance to n8n. | |
| + | |||
| + | You can connect to your Dolibarr account from the `Credentials` tab or directly from a Dolibarr node. | ||
| + | [[File:Credentials.png|center|thumb|Credentials]] | ||
| − | |||
You have to indicate you base URL which is your instance URL. | You have to indicate you base URL which is your instance URL. | ||
| − | And your API key that you can find in your account parameters when | + | And your API key that you can find in your account parameters when connected in Dolibarr. |
| + | <br /> | ||
| + | ====Fields in every node==== | ||
<br /> | <br /> | ||
| + | [[File:Add event n8n.png|center|thumb|Fields in every node]] | ||
| − | |||
| − | |||
For every Dolibarr node there will be some fields that will be the same. | For every Dolibarr node there will be some fields that will be the same. | ||
| − | These | + | These fields are the first three one on the picture below: |
| − | *'''Credential''' | + | *'''Credential to connect with''': this is where you can set your '''credentials''' as explained just before, |
| − | *'''Resource''' : this is where you | + | *'''Resource''': this is where you choose which module of Dolibarr will be affected, there are 4 options : Calendar, Task, Document and Custom API Call (use this one only if you know what you are doing), |
| − | *'''Operation''' : this is in this field where you select | + | *'''Operation''': this is in this field where you select the kind of operation you want to do on this specific resource, for now it only supports creation operation. |
| + | <br /> | ||
===Creating a Calendar Event=== | ===Creating a Calendar Event=== | ||
The first node is used to create an event in the calendar in Dolibarr. | The first node is used to create an event in the calendar in Dolibarr. | ||
| − | [[File:Add event n8n.png|center|thumb|Add event n8n]] | + | [[File:Add event n8n.png|center|thumb|Add event in n8n]] |
| − | If you have selected the '''Create an Event''' and have alreary set your credentials the first three fields will be already completed. | + | If you have selected the '''Create an Event''' operation and have alreary set your credentials the first three fields will be already completed. |
| − | For the next fields : | + | For the next fields: |
*'''Event Name''' corresponds with the '''Label''' field in Dolibarr interface (this field is required), | *'''Event Name''' corresponds with the '''Label''' field in Dolibarr interface (this field is required), | ||
| − | *'''Description''' corresponds with the '''Description''' field (this field is optional) | + | *'''Description''' corresponds with the '''Description''' field (this field is optional), |
| − | *'''Event Type''' corresponds with the '''Type''' field, three options are available : '''Intervention on site''', '''Meetings''' and '''Reception of Email''' (this field is required), | + | *'''Event Type''' corresponds with the '''Type''' type field, three options are available : '''Intervention on site''', '''Meetings''' and '''Reception of Email''' (this field is required), |
*'''Beginning Date of Event''' corresponds with the left date in the '''Date''' field (this field is required), | *'''Beginning Date of Event''' corresponds with the left date in the '''Date''' field (this field is required), | ||
*'''End Date of Event''' corresponds with the right date in the '''Date''' field (this field is required), | *'''End Date of Event''' corresponds with the right date in the '''Date''' field (this field is required), | ||
| − | *'''Email From''' is not corresponding to any field for now on Dolibarr but since this field is present in Dolibarr | + | *'''Email From''' is not corresponding to any field for now on Dolibarr but since this field is present in Dolibarr API, it is possible that is the next updates a dedicated Mail Sender field will be available on the Dolibarr interface (this field is optional), |
| − | *'''Email Subject''' is also not corresponding to any field for now on Dolibarr and as | + | *'''Email Subject''' is also not corresponding to any field for now on Dolibarr and as the previous one we can expect that a dedicated field appears is the next updates (this field is optional). |
| − | |||
| − | |||
| − | |||
| + | <br /> | ||
| + | [[File:Add event dolibarr.png|center|thumb|Add event in Dolibarr]] | ||
| + | <br /> | ||
====Creating an event in Calendar when an event is created in Google Calendar==== | ====Creating an event in Calendar when an event is created in Google Calendar==== | ||
To produce this use case you will have to connect a '''Google Calendar Trigger node''' on the '''Dolibarr node'''. | To produce this use case you will have to connect a '''Google Calendar Trigger node''' on the '''Dolibarr node'''. | ||
| − | The '''Google Calendar Trigger node''' documentation can be found | + | The '''Google Calendar Trigger node''' documentation can be found [https://docs.n8n.io/integrations/builtin/trigger-nodes/n8n-nodes-base.googlecalendartrigger/ here]. |
Once you have set up the '''Google Calendar Trigger node''' you can connect it to the '''Dolibarr Create an event node'''. | Once you have set up the '''Google Calendar Trigger node''' you can connect it to the '''Dolibarr Create an event node'''. | ||
| + | <br /> | ||
| + | [[File:Google calendar use case.png|center|thumb|Creating an event in Calendar when an event is created in Google Calendar]] | ||
| − | |||
| − | |||
| − | |||
| − | |||
| − | One possible configuration to have the wanted informations is to enter to same informations as the screenshot. | + | One possible configuration to have the wanted informations is to enter to same informations as in the screenshot. |
Be sure to select '''Expression''' mode on fields that use the previous node informations. | Be sure to select '''Expression''' mode on fields that use the previous node informations. | ||
| Line 85: | Line 105: | ||
You can either type or drag and drop from the left window which field you want to have from the Google Calendar Event. | You can either type or drag and drop from the left window which field you want to have from the Google Calendar Event. | ||
| − | Here : | + | Here: |
| − | *<code>$json.summary</code> | + | *<code>$json.summary</code> corresponds to the Google Caldendar Event Name, |
| − | *<code>$json.htmlLink</code> | + | *<code>$json.htmlLink</code> corresponds to the Google Caldendar event URL (doing this is optional since description can be empty as explained before, entering the URL only facilitate the Google Calendar event access from Dolibarr), |
| − | *<code>$json.start.dateTime</code> | + | *<code>$json.start.dateTime</code> corresponds to the starting time of the Google Calendar event, |
| − | *<code>$json.end.dateTime</code> | + | *<code>$json.end.dateTime</code> corresponds to the ending time of the Google Calendar event. |
<br /> | <br /> | ||
| + | |||
====Creating an event in Calendar when an email is received==== | ====Creating an event in Calendar when an email is received==== | ||
To produce this use case you will have to connect an '''Email Trigger node''' on the '''Dolibarr node''', for example the '''Email Trigger (IMAP) node''' or the '''Gmail Trigger node'''. | To produce this use case you will have to connect an '''Email Trigger node''' on the '''Dolibarr node''', for example the '''Email Trigger (IMAP) node''' or the '''Gmail Trigger node'''. | ||
| − | The '''Email Trigger (IMAP) node''' documentation can be found | + | The '''Email Trigger (IMAP) node''' documentation can be found [https://docs.n8n.io/integrations/builtin/core-nodes/n8n-nodes-base.emailimap/ here] and the '''Gmail Trigger node''' one [https://docs.n8n.io/integrations/builtin/trigger-nodes/n8n-nodes-base.gmailtrigger/). here]. |
| − | |||
| − | |||
| + | As before, when you have set up the trigger node you can connect it to the '''Dolibarr Create an event node'''. | ||
<br /> | <br /> | ||
| − | [[File: | + | [[File:Mail use case before update.png|center|thumb|Creating an event in Calendar when an email is received before update]] |
| − | For the example of configuration the '''Email Trigger node''' case will be presented since it is the more general case. One possible configuration to have the wanted informations is to enter to same informations as the screenshot. | + | For the example of configuration, this is the '''Email Trigger node''' case that will be presented since it is the more general case. One possible configuration to have the wanted informations is to enter to same informations as the screenshot. |
Be sure to select '''Expression''' mode on fields that use the previous node informations. | Be sure to select '''Expression''' mode on fields that use the previous node informations. | ||
| Line 110: | Line 130: | ||
You can either type or drag and drop from the '''INPUT''' window on the left which field you want to have from the received mail. | You can either type or drag and drop from the '''INPUT''' window on the left which field you want to have from the received mail. | ||
| − | Here : | + | Here: |
| + | |||
| + | *<code>$json.subject</code> corresponds to the subject of the mail, | ||
| + | *<code>$json.textPlain</code> corresponds to the email sender, | ||
| + | *<code>$json.from</code> corresponds to the body of the email, | ||
| + | *<code>$json.date</code> corresponds to the date when the email was sent. | ||
| − | + | The '''Gmail Trigger node''' will be similar, you can find the desired field using the '''INPUT''' window on the left in '''Schema''' mode to help yourself. | |
| − | + | <br /> | |
| − | + | [[File:Mail use case after update.png|center|thumb|Creating an event in Calendar when an email is received after update]] | |
| − | |||
| + | The second screenshot correspond to a possible configuration of the `Dolibarr Create an event Node` with the `Email Trigger (IMAP) node` when the `Email From` and `Email Subject` fields will be implemented in the Dolibarr interface in future updates. | ||
<br /> | <br /> | ||
| − | |||
| − | |||
| − | |||
===Creating a document=== | ===Creating a document=== | ||
| − | The second node is used to | + | The second node is used to create a document on a specific Dolibarr module. |
| − | |||
<br /> | <br /> | ||
| − | [[File:Add document n8n.png|center|thumb|Add document n8n]] | + | [[File:Add document n8n.png|center|thumb|Add a document in n8n]] |
| − | If you have selected | + | If you have selected '''Create a document''' and have alreary set your credentials the first two fields will be already completed. |
| − | For the next fields : | + | For the next fields: |
| − | *'''File Name''' | + | *'''File Name''' corresponds to the file name is Dolibarr, it is important not to forget the file extension if you want it to have one (this field is required), |
| − | *'''Module Name''' | + | *'''Module Name''' corresponds to the Dolibarr module where the file will be created (this field is required), |
| − | *'''Reference''' | + | *'''Reference''' corresponds to the `Ref.` of the object to which the file will be linked (this field is required), |
| − | *'''File Content''' | + | *'''File Content''' corresponds to the content that will be written in the file (this field is optional), |
| − | *'''File Encoding''' is an additionnal field that needs to be activated if you want to add file with formatting like pdf which needs to be encoded in base64 (this field is optional), | + | *'''File Encoding''' is an additionnal field that needs to be activated if you want to add file with formatting, like pdf which needs to be encoded in base64 (this field is optional), |
| − | *'''Overwrite File if It Already Exists ?''' is an additionnal field | + | *'''Overwrite File if It Already Exists ?''' is an additionnal field that when activated will allow file overwriting if the File Name entered already exists (this field is optional), |
*'''Create Subdirectories if Necessary ?''' is an additionnal field that when activated creates a Subdirectory for your file if this is necessery (this field is optional). | *'''Create Subdirectories if Necessary ?''' is an additionnal field that when activated creates a Subdirectory for your file if this is necessery (this field is optional). | ||
<br /> | <br /> | ||
| + | |||
====Add a document in Dolibarr Document Gestion containing Zoom meeting information==== | ====Add a document in Dolibarr Document Gestion containing Zoom meeting information==== | ||
To produce this use case you will have to connect an '''Zoom Get Meeting node''' on the '''Dolibarr node''' with a '''n8n Trigger node''' at the beggining of the workflow. | To produce this use case you will have to connect an '''Zoom Get Meeting node''' on the '''Dolibarr node''' with a '''n8n Trigger node''' at the beggining of the workflow. | ||
| − | The '''Zoom node''' documentation can be found | + | The '''Zoom node''' documentation can be found [https://docs.n8n.io/integrations/builtin/app-nodes/n8n-nodes-base.zoom/). here]. |
As before when have set up the node you can connect it to the '''Dolibarr Create an event node'''. | As before when have set up the node you can connect it to the '''Dolibarr Create an event node'''. | ||
| − | [[File:Zoom use case.png|center|thumb|Zoom | + | <br /> |
| + | [[File:Zoom use case.png|center|thumb|Add a document in Dolibarr Document Gestion containing Zoom meeting information]] | ||
| − | One possible configuration to have a Zoom meeting informations is to enter to same informations as the screenshot. | + | One possible configuration to have a Zoom meeting informations is to enter to same informations as on the screenshot. |
Be sure to select '''Expression''' mode on fields that use the previous node informations. | Be sure to select '''Expression''' mode on fields that use the previous node informations. | ||
| Line 158: | Line 181: | ||
You can either type or drag and drop from the '''INPUT''' window on the left which field you want to have from the received mail. | You can either type or drag and drop from the '''INPUT''' window on the left which field you want to have from the received mail. | ||
| − | Here : | + | Here: |
| − | *<code>$json.topic</code> | + | *<code>$json.topic</code> corresponds to the topic of the Zoom meeting, |
| − | *<code>$json. | + | *<code>$json.host_email</code> corresponds to the email of the person who host the Zoom meeting, |
| − | *<code>$json.duration</code> | + | *<code>$json.duration</code> corresponds to the duration of the Zoom metting, |
| − | *<code>$json.timezone</code> | + | *<code>$json.timezone</code> corresponds to the time zone where was done the Zoom metting. |
| − | Besides, a .docx file extension is added to generate a file compatible with LibreOffice Writer, this format does not need File | + | Besides, a .docx file extension is added to generate a file compatible with LibreOffice Writer, this format does not need '''File Encoding'''. |
| − | This file will be | + | This file will be added to the Agenda Event associated with the Zoom meeting, in the example this is the event with the '''Reference''' n°33. |
| − | |||
| − | |||
| + | Finally, the additional Field '''Overwrite File If Already Exists ?''' is activated to be able ot overwrite the file with more or different informations from the Zoom meeting if wanted. | ||
| + | <br /> | ||
===Creating a Project Task=== | ===Creating a Project Task=== | ||
| − | <br />[[File:Add task n8n.png|center|thumb|Add task n8n]] | + | The third node is used to create a task in the project module of Dolibarr. |
| − | + | <br /> | |
| + | [[File:Add task n8n.png|center|thumb|Add task in n8n]] | ||
| − | |||
| − | If you have selected | + | If you have selected '''Create a Task''' and have alreary set your credentials the first three fields will be already completed. |
| − | For the next fields : | + | For the next fields: |
| − | *'''Task Reference''' corresponds with the '''Ref.''' field in Dolibarr interface, the '''Task Reference''' is a ''string'' that must be unique, (this field is required), | + | *'''Task Reference''' corresponds with the '''Ref.''' field in Dolibarr interface, the '''Task Reference''' is a '''string''' that must be unique, (this field is required), |
*'''Project ID''' corresponds with the '''Child of project''' field, this is a number corresponding to the id of the project from which the task will be a child (this field is required), | *'''Project ID''' corresponds with the '''Child of project''' field, this is a number corresponding to the id of the project from which the task will be a child (this field is required), | ||
*'''Task Name''' corresponds with the '''Label''' field (this field is required), | *'''Task Name''' corresponds with the '''Label''' field (this field is required), | ||
| Line 190: | Line 213: | ||
<br /> | <br /> | ||
| − | [[File:Add task dolibarr.png|center|thumb|Add task | + | [[File:Add task dolibarr.png|center|thumb|Add task in Dolibarr]] |
<br /> | <br /> | ||
| Line 196: | Line 219: | ||
To produce this use case you will have to connect a '''Github Trigger node''' on the '''Dolibarr node'''. | To produce this use case you will have to connect a '''Github Trigger node''' on the '''Dolibarr node'''. | ||
| − | It is important here if you are using a self-hosted instance of n8n to start it in tunnel mode. To do so, just run the following command : <code>n8n start --tunnel</code>. | + | It is important here if you are using a self-hosted instance of n8n to start it in tunnel mode. To do so, just run the following command: <code>n8n start --tunnel</code>. |
To trigger on receiving issues select the type '''Issues''' in the '''Events''' field. | To trigger on receiving issues select the type '''Issues''' in the '''Events''' field. | ||
| − | The '''Github Trigger node''' documentation can be found | + | The '''Github Trigger node''' documentation can be found [https://docs.n8n.io/integrations/builtin/trigger-nodes/n8n-nodes-base.githubtrigger/ here]. |
Once you have set up the '''Github Trigger node''' you can connect it to the '''Dolibarr Create a task node'''. | Once you have set up the '''Github Trigger node''' you can connect it to the '''Dolibarr Create a task node'''. | ||
| − | |||
<br /> | <br /> | ||
[[File:Github use case.png|center|thumb|Creating a Task in Dolibarr when a Github issue is received]] | [[File:Github use case.png|center|thumb|Creating a Task in Dolibarr when a Github issue is received]] | ||
| − | One possible configuration to have the wanted informations is to enter to same informations as the screenshot. | + | One possible configuration to have the wanted informations is to enter to same informations as on the screenshot. |
Be sure to select '''Expression''' mode on fields that use the previous node informations. | Be sure to select '''Expression''' mode on fields that use the previous node informations. | ||
| Line 214: | Line 236: | ||
You can either type or drag and drop from the left window which field you want to have from the Github Issue. | You can either type or drag and drop from the left window which field you want to have from the Github Issue. | ||
| − | Here : | + | Here: |
| − | *<code>$json.body.repository.name</code> | + | *<code>$json.body.repository.name</code> corresponds to the name of the Github repository, |
| − | *<code>$json.body.issue.title</code> | + | *<code>$json.body.issue.title</code> corresponds to the title of the issue, |
| − | *<code>$json.body.issue.body</code> | + | *<code>$json.body.issue.body</code> corresponds to comment leave on the issue, |
| − | *<code>$json.body.issue.created_at</code> | + | *<code>$json.body.issue.created_at</code> corresponds to the creation date of the issue. |
| − | |||
==Conclusion== | ==Conclusion== | ||
| − | This tutorial helped you understand how to configure a Dolibarr node in n8n and how they work in order to make you build the example use cases or custom use cases using already existing Dolibarr node | + | This tutorial helped you understand how to configure a Dolibarr node in n8n and how they work in order to make you build the example use cases or custom use cases using already existing Dolibarr node functionalities. |
| + | |||
| + | ==Credits== | ||
| + | This tutorial was produced by the [https://github.com/AuTEAMation AuTEAMation] team as part of the design of interfacing prototypes between the Dolibarr ERP/CRM and several automation platforms for [https://www.dolicloud.com/ DoliCloud]. This study was carried out as part of the PFA, a 2nd year group project at [https://enseirb-matmeca.bordeaux-inp.fr ENSEIRB-MATMECA]. | ||
Latest revision as of 09:47, 25 May 2023
If you want a developer tutorial to the integration of Dolibarr to the n8n automation platform you can find it here.
Prerequisites
The following tutorial assumes that you have completed the following prerequisites:
- You have access to an instance of Dolibarr configured to use SSL encryption (with the HTTPS protocol),
- You have access to a user account with rights to use some specific modules such as Calendar, Project or Documents,
- You have obtained an API key for this user account that you will be used to test your integration (generated by an administrator, or by the user himself if he has permission to modify his user account information).
When necessary, in this documentation, we will use the following URL to refer to your Dolibarr instance: `https://yourdolibarrurl`. You will have to replace it with the URL of your own Dolibarr instance, without trailing slash.
Connecting to n8n
As explained in previous parts, once you have created your n8n self-hosted instance on your computer and started it with the command : n8n start or n8n.
Then you just have to press o on your terminal to open n8n in your browser.
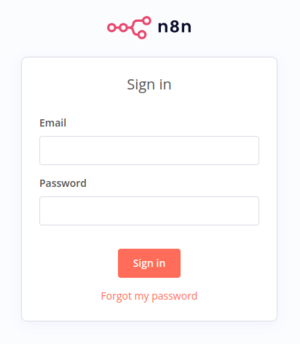
You should arrive to the following connexion screen where you can enter your connexion informations.
Creating a Workflow using Dolibarr Node
When you have signed in, you can create you first Workflow and selected the Dolibarr node.
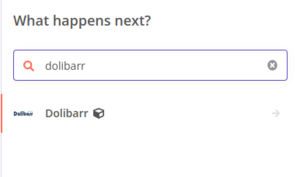
To do that, you just have to click on Add Workflow to create one and click on the + to add a node to your Workflow. It will open a search bar in which you can search dolibarr to find it.
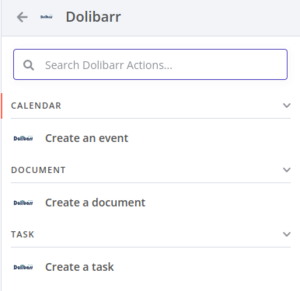
Explanation of the different functionalities
Here are the different Dolibarr functionalities we have implemented in n8n.
General informations
Credentials
A Dolibarr node needs to have set up credentials in order to connect your Dolibarr instance to n8n.
You can connect to your Dolibarr account from the `Credentials` tab or directly from a Dolibarr node.
You have to indicate you base URL which is your instance URL.
And your API key that you can find in your account parameters when connected in Dolibarr.
Fields in every node
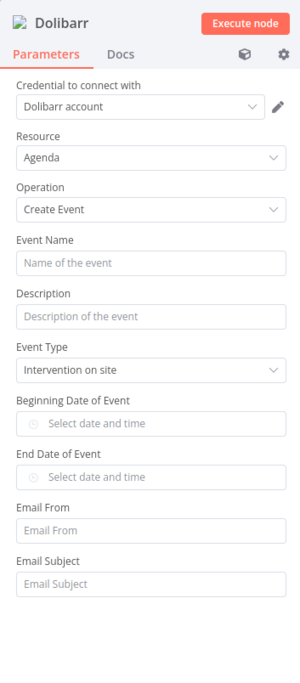
For every Dolibarr node there will be some fields that will be the same.
These fields are the first three one on the picture below:
- Credential to connect with: this is where you can set your credentials as explained just before,
- Resource: this is where you choose which module of Dolibarr will be affected, there are 4 options : Calendar, Task, Document and Custom API Call (use this one only if you know what you are doing),
- Operation: this is in this field where you select the kind of operation you want to do on this specific resource, for now it only supports creation operation.
Creating a Calendar Event
The first node is used to create an event in the calendar in Dolibarr.
If you have selected the Create an Event operation and have alreary set your credentials the first three fields will be already completed.
For the next fields:
- Event Name corresponds with the Label field in Dolibarr interface (this field is required),
- Description corresponds with the Description field (this field is optional),
- Event Type corresponds with the Type type field, three options are available : Intervention on site, Meetings and Reception of Email (this field is required),
- Beginning Date of Event corresponds with the left date in the Date field (this field is required),
- End Date of Event corresponds with the right date in the Date field (this field is required),
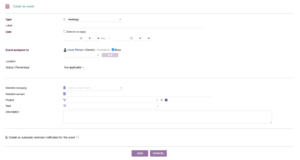
- Email From is not corresponding to any field for now on Dolibarr but since this field is present in Dolibarr API, it is possible that is the next updates a dedicated Mail Sender field will be available on the Dolibarr interface (this field is optional),
- Email Subject is also not corresponding to any field for now on Dolibarr and as the previous one we can expect that a dedicated field appears is the next updates (this field is optional).
Creating an event in Calendar when an event is created in Google Calendar
To produce this use case you will have to connect a Google Calendar Trigger node on the Dolibarr node.
The Google Calendar Trigger node documentation can be found here.
Once you have set up the Google Calendar Trigger node you can connect it to the Dolibarr Create an event node.
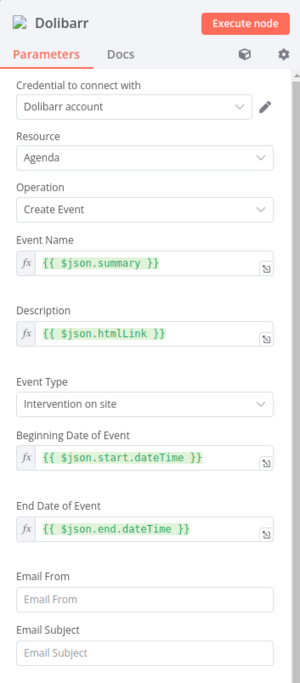
One possible configuration to have the wanted informations is to enter to same informations as in the screenshot.
Be sure to select Expression mode on fields that use the previous node informations.
You can either type or drag and drop from the left window which field you want to have from the Google Calendar Event.
Here:
$json.summarycorresponds to the Google Caldendar Event Name,$json.htmlLinkcorresponds to the Google Caldendar event URL (doing this is optional since description can be empty as explained before, entering the URL only facilitate the Google Calendar event access from Dolibarr),$json.start.dateTimecorresponds to the starting time of the Google Calendar event,$json.end.dateTimecorresponds to the ending time of the Google Calendar event.
Creating an event in Calendar when an email is received
To produce this use case you will have to connect an Email Trigger node on the Dolibarr node, for example the Email Trigger (IMAP) node or the Gmail Trigger node.
The Email Trigger (IMAP) node documentation can be found here and the Gmail Trigger node one here.
As before, when you have set up the trigger node you can connect it to the Dolibarr Create an event node.
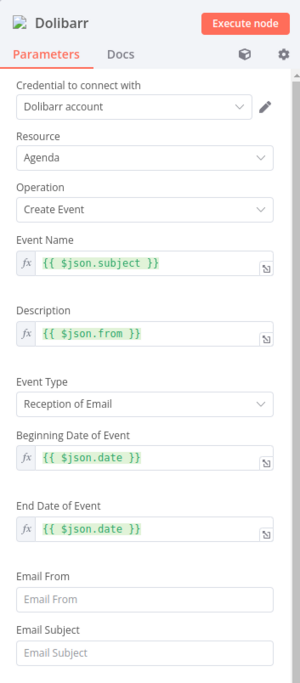
For the example of configuration, this is the Email Trigger node case that will be presented since it is the more general case. One possible configuration to have the wanted informations is to enter to same informations as the screenshot.
Be sure to select Expression mode on fields that use the previous node informations.
You can either type or drag and drop from the INPUT window on the left which field you want to have from the received mail.
Here:
$json.subjectcorresponds to the subject of the mail,$json.textPlaincorresponds to the email sender,$json.fromcorresponds to the body of the email,$json.datecorresponds to the date when the email was sent.
The Gmail Trigger node will be similar, you can find the desired field using the INPUT window on the left in Schema mode to help yourself.
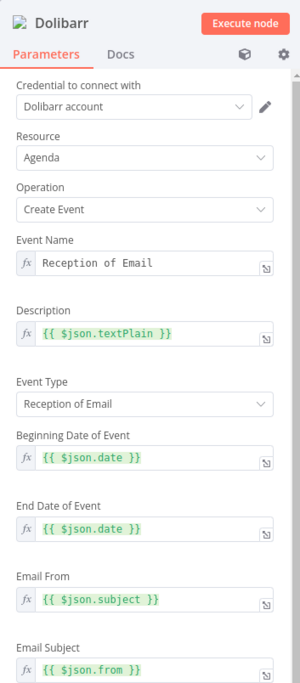
The second screenshot correspond to a possible configuration of the `Dolibarr Create an event Node` with the `Email Trigger (IMAP) node` when the `Email From` and `Email Subject` fields will be implemented in the Dolibarr interface in future updates.
Creating a document
The second node is used to create a document on a specific Dolibarr module.
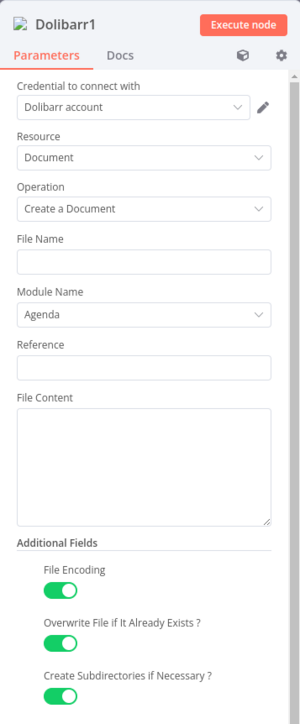
If you have selected Create a document and have alreary set your credentials the first two fields will be already completed.
For the next fields:
- File Name corresponds to the file name is Dolibarr, it is important not to forget the file extension if you want it to have one (this field is required),
- Module Name corresponds to the Dolibarr module where the file will be created (this field is required),
- Reference corresponds to the `Ref.` of the object to which the file will be linked (this field is required),
- File Content corresponds to the content that will be written in the file (this field is optional),
- File Encoding is an additionnal field that needs to be activated if you want to add file with formatting, like pdf which needs to be encoded in base64 (this field is optional),
- Overwrite File if It Already Exists ? is an additionnal field that when activated will allow file overwriting if the File Name entered already exists (this field is optional),
- Create Subdirectories if Necessary ? is an additionnal field that when activated creates a Subdirectory for your file if this is necessery (this field is optional).
Add a document in Dolibarr Document Gestion containing Zoom meeting information
To produce this use case you will have to connect an Zoom Get Meeting node on the Dolibarr node with a n8n Trigger node at the beggining of the workflow.
The Zoom node documentation can be found here.
As before when have set up the node you can connect it to the Dolibarr Create an event node.
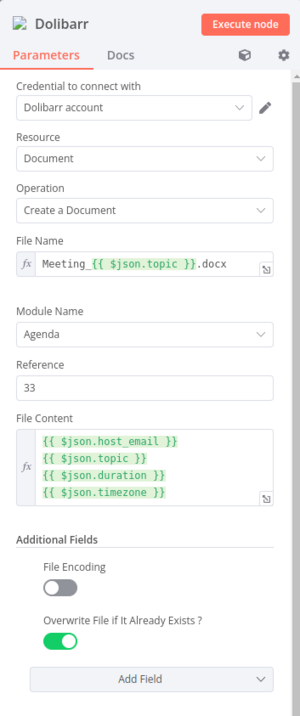
One possible configuration to have a Zoom meeting informations is to enter to same informations as on the screenshot.
Be sure to select Expression mode on fields that use the previous node informations.
You can either type or drag and drop from the INPUT window on the left which field you want to have from the received mail.
Here:
$json.topiccorresponds to the topic of the Zoom meeting,$json.host_emailcorresponds to the email of the person who host the Zoom meeting,$json.durationcorresponds to the duration of the Zoom metting,$json.timezonecorresponds to the time zone where was done the Zoom metting.
Besides, a .docx file extension is added to generate a file compatible with LibreOffice Writer, this format does not need File Encoding.
This file will be added to the Agenda Event associated with the Zoom meeting, in the example this is the event with the Reference n°33.
Finally, the additional Field Overwrite File If Already Exists ? is activated to be able ot overwrite the file with more or different informations from the Zoom meeting if wanted.
Creating a Project Task
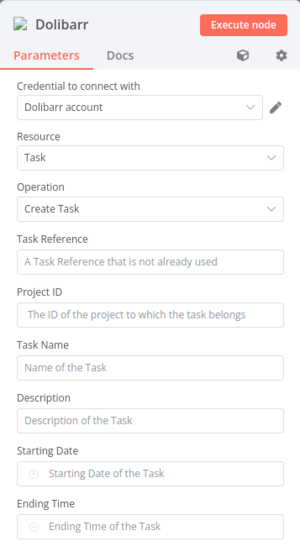
The third node is used to create a task in the project module of Dolibarr.
If you have selected Create a Task and have alreary set your credentials the first three fields will be already completed.
For the next fields:
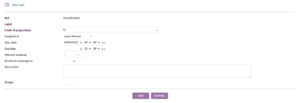
- Task Reference corresponds with the Ref. field in Dolibarr interface, the Task Reference is a string that must be unique, (this field is required),
- Project ID corresponds with the Child of project field, this is a number corresponding to the id of the project from which the task will be a child (this field is required),
- Task Name corresponds with the Label field (this field is required),
- Description corresponds with the Description field (this field is optional),
- Starting Date corresponds with the left date in the Date field (this field is required),
- Ending Date corresponds with the right date in the Date field (this field is optional).
Creating a Task in Dolibarr when a Github issue is received
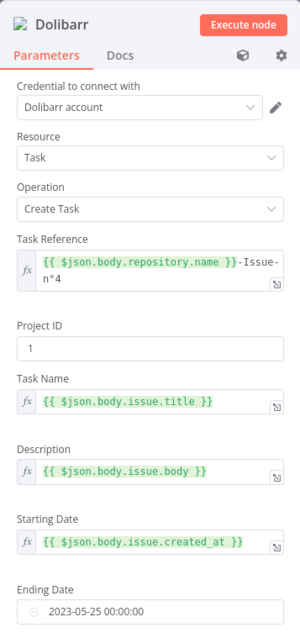
To produce this use case you will have to connect a Github Trigger node on the Dolibarr node.
It is important here if you are using a self-hosted instance of n8n to start it in tunnel mode. To do so, just run the following command: n8n start --tunnel.
To trigger on receiving issues select the type Issues in the Events field.
The Github Trigger node documentation can be found here.
Once you have set up the Github Trigger node you can connect it to the Dolibarr Create a task node.
One possible configuration to have the wanted informations is to enter to same informations as on the screenshot.
Be sure to select Expression mode on fields that use the previous node informations.
You can either type or drag and drop from the left window which field you want to have from the Github Issue.
Here:
$json.body.repository.namecorresponds to the name of the Github repository,$json.body.issue.titlecorresponds to the title of the issue,$json.body.issue.bodycorresponds to comment leave on the issue,$json.body.issue.created_atcorresponds to the creation date of the issue.
Conclusion
This tutorial helped you understand how to configure a Dolibarr node in n8n and how they work in order to make you build the example use cases or custom use cases using already existing Dolibarr node functionalities.
Credits
This tutorial was produced by the AuTEAMation team as part of the design of interfacing prototypes between the Dolibarr ERP/CRM and several automation platforms for DoliCloud. This study was carried out as part of the PFA, a 2nd year group project at ENSEIRB-MATMECA.
